Hi All,
Our Kelt 7.6 had moisture on the port side of the V-berth after heavy rain for a number of years, but we couldn’t figure out where it was coming from. At first, we thought it was coming through the hatch, but after covering the hatch with a Rubbermaid bin made no difference, we started tracing the leak. After a day with the hose spraying here and there, we discovered that the water was coming in from the toe rail, because if we left the water running only on the toe rail, it entered the V-berth.
Our first attempt to stop the leak involved taking some of the toe rail bolts out, and putting sealant in the holes, and putting the bolts back. Unfortunately, the holes weren’t the places that had leaks, so this had no effect on the leaks into the V-berth.
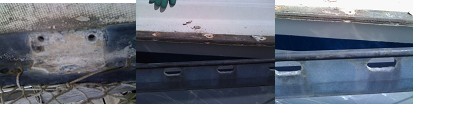
The next step was to remove the entire toe rail. This required removal of the pulpit, the rear railing, the lifeline stantions, and the 45 bolts holding the toe rail down. The following pictures show the corrosion of the toe rail under the stantions, and what we saw as the toe rail came off.
After the edge of the deck dried out for a bit, and we had cleaned things up, it turned out that it wasn’t as bad as it initially looked. There were a couple of places where the deck-hull connection had not sealed together properly, and this was where the water was coming in. There were therefore two pieces to fix: the deck-hull connection where the epoxy had cracked and the toe rail to deck seal.
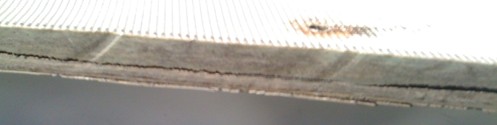
After consulting with a fibreglass expert, we decided to grind a groove into the edge of the deck (along the crack), and seal this with thickened epoxy. This was considered a good option as the fibreglass on top and bottom appeared to be in good shape, and it was only the seal between the deck and the hull that needed to be repaired. The grinding would provide a fresh fibreglass surface for the epoxy to adhere to. After grinding out the cracks, and filling with epoxy, things are already starting to look better. There were two places where I did this, one about 3’ long, and the other about 1’ long. The rest of the edge of the deck appeared to be in good shape.

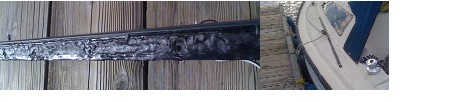
Re-installing the toe rail took a bit of work (and a couple of extra hands), but went smoothly. On the advice of a friend, and after researching it on the internet, we sealed the toe rail to the deck with butyl tape.
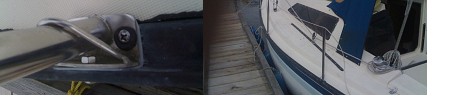
And finally, re-installing the stantions: we put a HDPE pad between the stantions and the toe rail to reduce the corrosion on the toe rail. This also helped seat the stantions on the unevenness of the somewhat corroded toe rail.
We’re ready for this season’s boating (even though we're already halfway through the season). In the fall we plan on doing the same to the starboard toe rail before significant leaks develop…

