Hi All,
Thanks, Glenn and Ryan, for your original posts about the Kelt 7.6 head, and the Nature’s Head composting toilet instead of a holding tank. It inspired me to look into this option as well, and I am now the proud owner of a composting toilet installed on our boat. I thought I would post on the forum so others could see how I installed it, as well as give the reasons we went with the composting option rather than a holding tank.
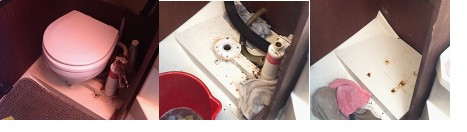
When we first got our boat, the toilet was in really rough shape – the pump was non-functional, and the part below the bowl needed replacing as it was old and on its last legs (see picture below of vice grip pliers permanently rusted to the pump handle). After some investigation, we figured it would end up costing us about $500 to install a holding tank and new toilet. As well, installing a decent size holding tank to allow us to go on more than weekend trips did not look possible due to the layout of the boat. For $1000, we could get a Nature’s Head composting toilet that would not require a holding tank (no pump outs) and would allow us to go on longer trips. Since Ryan had already indicated that they had installed one, we figured it was worth going that route, and we purchased a Nature’s Head for our boat.
The first step to installing the composting toilet was to remove the old toilet. This ended up being easier than I expected (though we haven’t yet removed the through hull fittings – this is scheduled for our next haul-out).
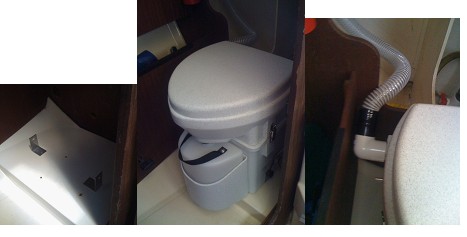
To install the Nature’s Head, there’s three pieces you need to install: The brackets that hold the toilet to the floor, the electrical connection for the fan, and the vent connection to the outside.
The brackets for the toilet are easy to install. I was a bit hesitant to drill into the hull near the edge of the head, as I did not know how thick the hull is at that point. It was even more heart-stopping when the drill bit went through into open air (luckily not open water)… It turned out that there is a double hull under the floor of the head, and that there is about two inches of air gap underneath where I drilled the holes, so it would be very difficult to drill through the hull. Once the brackets are installed, it is a simple matter of placing the Nature’s Head in and screwing the retaining screws into place. When we determined the best place to install the head, we placed it centred between the port and starboard sides of the head, and about 3 or 4 inches forward of the rear bulkhead. This seemed to be the most useful position that would allow me (6’2”) to use it ‘comfortably’.
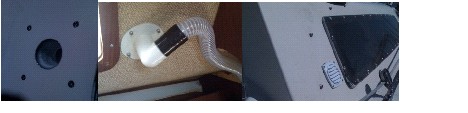
As noted in the installation manual, a PVC elbow works great to get the exhaust hose to come out of the head at a sharp angle. It took a couple of attempts, shifting the head around and back and forth, to get the right fit of the head with the elbow installed and enough room to sit on it.
The installation of the electrical wiring is a bit complicated, but I took no pictures (they’d just look like a mess of electrical wires). I crimped the provided fuse to the extension wires provided with the head, and then crimped on ring connectors that allowed me to wire the fan connection to the battery connections on the back of the electrical panel.
The final piece was installing a vent, probably the most complicated part of the installation. Although Ryan notes that he vented to the Starboard locker, I felt it better to vent to the outside directly. After looking in many parts catalogues, we found a 3” vent that looked like it would work (A Seadog 337310). The picture in the catalogue did not show that it had a 3” diameter, ¾” deep piece on the inside that would fit into a 3” hose hole, so I had to cut that off (easily done with a utility knife). It was a $2.50 part, so I wasn’t too worried if I accidently ruined it. Rather than risking water getting in through the vent (it is installed on the hull just aft of the starboard window) I decided to epoxy the vent attachment to another PVC elbow, and epoxy the elbow/vent attachment to the hull pointing upwards. If the vent cover wasn’t there, the water would just pool in the elbow and evaporate over time. It does look nicer with the vent cover in place.
And finally, adding the composting material to make the toilet ready to use.
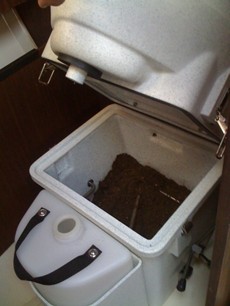
To date (it has only been installed for a week now, and we’ve been away), no one has used the newly installed head, but we’re looking forward to a weekend trip later in August to try things out.

